
Text On Dashboards
👤 This documentation is intended for SQL Users and Discovery Users with Edit Access.
Creating a dashboard is just one part of conveying information to consumers. Adding text on dashboards allows a story to be told alongside the data. This helps make dashboards more usable and shareable.
<UL>
<LI><a href="#ToDUseCases"> Use Cases</a></LI>
<LI><a href="#HowItWorks">How It Works</a></LI>
<UL>
<LI><a href="#CreateANew">Create A New Text Box</a></LI>
<LI><a href="#Move">Move The Text Box</a></LI>
<LI><a href="#Customizations">Text Customizations</a></LI>
<LI><a href="#Delete">Delete A Text Box</a></LI>
</UL>
</UL>
Note: Text on Dashboards is available on select plans. Site administrators can contact their Account Manager for additional information.
<HR>
<a name="ToDUseCases"></a>
Use Cases
<OL>
<LI><b>Understand at a Glance</b></LI>
<UL><LI>Easily add text headers and announcements to provide high-level context for dashboard consumers.</a></LI></UL>
<LI><b>Define the Data</b></LI>
<UL><LI>Gives users the ability to provide insightful descriptions on the what is behind the organization’s key metrics by including text definitions in-line with visualizations.</b></LI></UL>
<LI><b>Annotate with Key Insights</b></LI>
<UL><LI>Illustrate takeaways throughout the dashboard to point to insights and trends users should focus on.</LI></UL>
</OL>
<a href="#top">Back to top</a>
<a name="HowItWorks"></a>
How It Works
<a name="CreateANew"></a>
Create A New Text Box
SQL and Discovery Users with edit access to a dashboard have the ability to draw a text box on the dashboard. To create a new text box, first click the "T" at the top right. Then, click on the dashboard to place the text box and drag the box to expand. Click the checkmark to save or use the save shortcut.
<a name="Move"></a>
Move The Text Box
To move the text box, first it needs to be saved. Then, select the text box and drag it on the dashboard to the desired place. To resize the text box, select the green lower bottom right corner and drag to expand or contract.

<a name="Customizations"></a>
Text Customizations
To customize the text, first click the green pencil to edit or hold the shift button and click on the text box. Then, highlight the text to edit.


There are many ways to customize the text:
- Character Options: Unicode and Emoji's are supported.
- Links: Click on the link icon to add the link to the selected text.
- Lists: Click on the number lists or the bullets list.
- Text Alignment: Click on the text alignment icon to choose to justify Left, Right, or Center.
- Typographical Emphasis: Click on the Bold, Italic, or Underline buttons to enable.
- Font Size: Click on the first dropdown and select the new size.
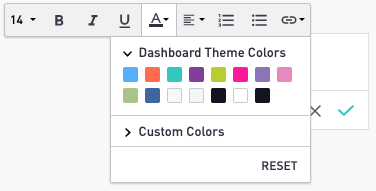
- Font Colors: Click on the text color button to view a list of recent colors, dashboard theme colors, or to set a custom color. Click on a color to select. More information on color themes can be found here.
To cancel edits, click on the "X" button and the text box will revert back to the last changed state.
<a name="Delete"></a>
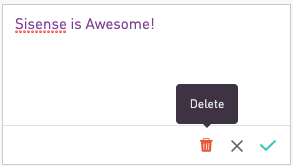
Delete A Text Box
To delete a text box, first click on the green pencil to edit. Then, click on the "Delete" button.
<a href="#top">Back to top</a>