
Scheduled Reports
👤 This documentation is intended for Site Administrators and SQL/Discovery Users.
Scheduling reports allows a user to schedule the time and day when they would like to send out a dashboard report, and the delivery method. Dashboards that are scheduled are always sent out with the default filters. Charts on the dashboard are refreshed at the specified time, and the email or slack is sent upon completion of the refresh.
Note: Scheduled Slack Reports are available on select plans. Site administrators can contact their Customer Success Manager for additional information.
<div><UL>
<LI><a href="#CheckDefaultFilters">Checking or Changing the Default Filters</a></LI>
<LI><a href="#CreateEmail">Creating an Email Report</a></LI>
<LI><a href="#CreateSlack">Creating a Slack Report</a></LI>
<LI><a href="#RestrictEmails">Restricting Reports</a></LI>
<LI><a href="#QualityCheck">Quality Check</a></LI>
</UL></div>
<HR>
<a name="CheckDefaultFilters"></a>
Checking or Changing the Default Filters
To check the default filters, open the filter ribbon and click the "Reset Filters" link at the bottom right.

Make sure that the filters set as default are the filters desired in the scheduled dashboard! To change the default filter set, choose the appropriate filters and then click "Set As Default."
<a href="#top">Back to top</a>
<a name="CreateEmail"></a>
Creating an Email Report
Once the default filters are set, select the "Dashboard Preferences" option in the dashboard menu.
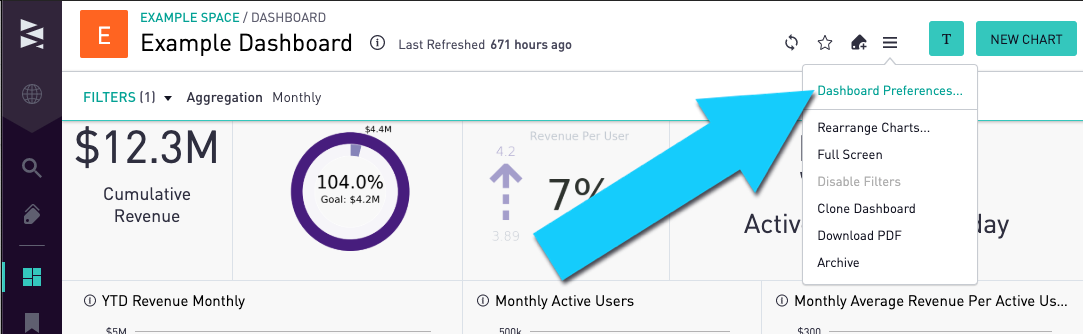
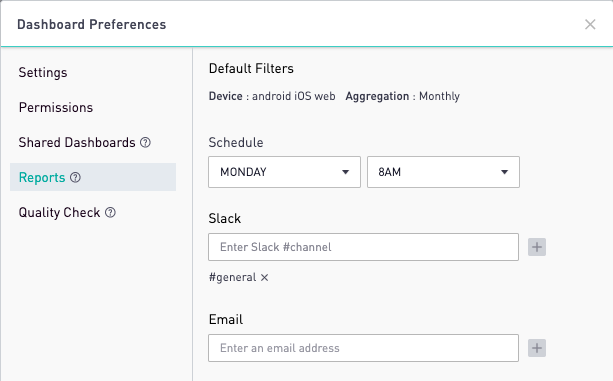
Then, click the "Reports" section. In the Schedule section you can select which days (or every day) and what time the report should be sent out. In the Email section you can add or remove emails to receive the report:

To send a test report, simply add the email and click "Send Test"!
Emails are sent with PNG image(s) of the dashboard in the body of the email, where longer dashboards may be broken up into multiple PNG images to avoid resampling by email providers. In addition to this, an unbroken PNG image of the dashboard is also included as an attachment.
<a href="#top">Back to top</a>
<a name="CreateSlack"></a>
Creating a Slack Report
Note: Scheduled Slack Reports are available on select plans. Site administrators can contact their Customer Success Manager for additional information.
Similar to setting up an email Report, once the default filters are set, select the "Dashboard Preferences" option in the dashboard menu.
Then, click the "Reports" section. In the Schedule section you can select which days (or every day) and what time the report should be sent out. In the Slack section you can add or remove Slack channels to receive the report:
Slacks are sent from the Sisense for Cloud Data Teams app with a screenshot of the dashboard in the Slack Message,
<a href="#top">Back to top</a>
<a name="RestrictEmails"></a>
Restricting Reports
Administrators may turn off the ability to send out email or Slack reports from the Preferences Menu in Settings.

Turning off email reports will discontinue any currently scheduled emails and remove the ability to Reports option from the Dashboards Preferences menu.

When either of the report functionalities are disabled, Sisense will archive the pre-configured settings for the reports. When the report functionality are re-enabled, the previous report settings will still be in place and will again take effect.
<a href="#top">Back to top</a>
<a name="QualityCheck"></a>
Quality Check
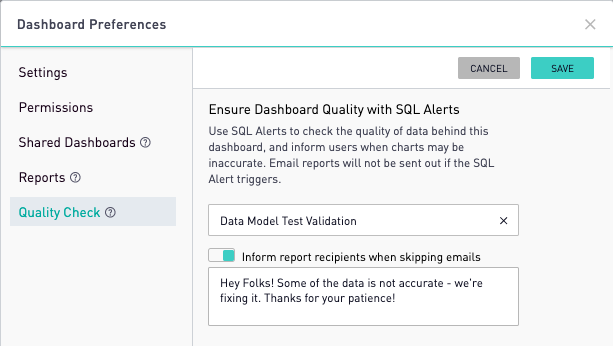
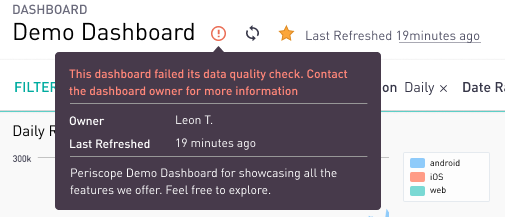
To ensure the quality of data behind a dashboard, set a quality check using a SQL Alert.
To set a quality check for a dashboard, navigate to the Dashboard Preferences menu and click the "Quality Check" section.
Select a SQL Alert to trigger. Please refer here for more information on setting up a SQL Alert.

If an email should be sent when a SQL Alert is triggered, please toggle the 'Inform report recipients when skipping emails' to green. In the text field below, verbiage for the email can be specified.
If the chosen SQL alert is triggered through the Quality Check setting in the Dashboard Preferences menu and the 'Inform recipients when skipping emails' toggle is not enabled, then an email report will not be sent.
If the chosen SQL alert is triggered through the Quality Check setting in the Dashboard Preferences menu and the 'Inform recipients when skipping emails' toggle is enabled, an email with the specified verbiage will be sent instead of the dashboard email report.
If the SQL alert is not triggered, email reports will be sent as specified in the Reports settings menu.
If the chosen SQL alert for a dashboard is triggered, the dashboard will also display an error message.
<a href="#top">Back to top</a>