
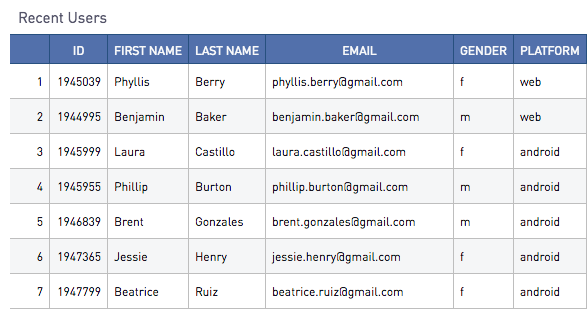
Table Overview
👤 This documentation is intended for SQL Users.
Tables are one of the most straightforward methods of displaying data and representing the underlying values returned by a query. They act as our default visualization type, and we offer a few different options to customize how they appear.
In this article:
<div><UL>
<LI><a href="#TableSettings">Table Settings</a></LI>
<UL>
<LI><a href="#KeepColumn">Keep Column Underscores</a></LI>
<LI><a href="#TransposeTable">Transpose Table</a></LI>
<LI><a href="#HidingLineNumbers">Hiding Line Numbers</a></LI>
<LI><a href="#RemovingBoarders">Removing Borders</a></LI>
<LI><a href="#AlignTable">Align Table</a></LI>
</UL>
<LI><a href="#SeriesSettings">Series Settings</a></LI>
<UL>
<LI><a href="#FormatDropdown">Format Dropdown</a></LI>
<LI><a href="#CurrencyField">Currency Field</a></LI>
<LI><a href="#DecimalsField">Decimals Field</a></LI>
<LI><a href="#Width">Width</a></LI>
<LI><a href="#Alignment">Alignment</a></LI>
<LI><a href="#TotalColumn">Column Total</a></LI>
</UL>
<LI><a href="#ColorSettingsConditional">Color Settings & Conditional Formatting</a></LI>
<UL>
<LI><a href="#ColorSettings">Color Settings</a></LI>
<LI><a href="#ConditionalFormatting">Conditional Formatting/a></LI>
<LI><a href="#DataBars">Data Bars</a></LI>
</UL>
<LI><a href="#Hyperlinks">Hyperlinks</a></LI>
<LI><a href="#TableImage">Images in Tables</a></LI>
<LI><a href="#TelephoneNumbers">Telephone Numbers</a></LI>
</UL></div>
<HR>
<a name="TableSettings"></a>
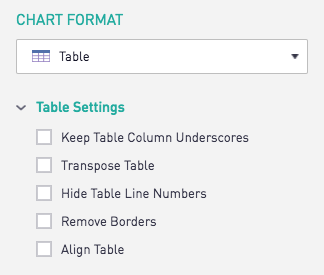
Table Settings
All of the options in this page can be found in the "Table Settings" section of the "Chart Format" tab.
<a href="#top">Back to top</a>
<a name="KeepColumn"></a>
Keep Column Underscores
By default, Sisense for Cloud Data Teams automatically replaces each underscore with a blank space. "Keep Table Column Underscores" displays the column name with the same underscores that were generated from the query.
<a href="#top">Back to top</a>
<a name="TransposeTable"></a>
Transpose Table
When checked, "Transpose Table" turns rows in columns and columns into rows.
<a href="#top">Back to top</a>
<a name="HidingLineNumbers"></a>
Hiding Line Numbers
By default, Sisense for Cloud Data Teams automatically inserts line numbers for each line. "Hiding Line Numbers" removes these auto-incrementing line numbers.
<a href="#top">Back to top</a>
<a name="RemovingBoarders"></a>
Removing Borders
By default, Sisense for Cloud Data Teams inserts borders between all rows and columns. "Remove Borders" removes all borders for the table.
<a href="#top">Back to top</a>
<a name="AlignTable"></a>
Align Table
There are two options for aligning the table within the grid space it resides. The Center option will place the table in the center of the grid space, and the Fill option will expand the table to the entire space allocated.
<a href="#top">Back to top</a>
<a name="SeriesSettings"></a>
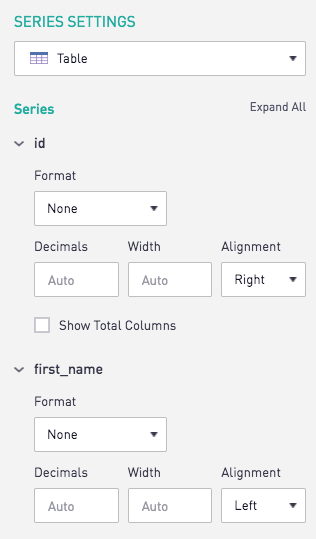
Series Settings
The "Series Settings" tab of the Editron offers multiple options for controlling the values in the table cells as well as the width of the columns and the text alignment. The tab should look like the following:
<a href="#top">Back to top</a>
<a name="FormatDropdown"></a>
Format Dropdown
The Format Dropdown Tab has 3 options: Number, Percent, and Currency. These can be selected to alter the numeric values in the table accordingly.
<a href="#top">Back to top</a>
<a name="CurrencyField"></a>
Currency Field
If the "Format" field is set to Currency, the currently supported types of currency become available in its dropdown. Please feel free to contact [email protected] if there are currencies you would like to see supported.
<a href="#top">Back to top</a>
<a name="DecimalsField"></a>
Decimals Field
The Decimal field controls how many decimal places are displayed for a numeric value in the table. It is a useful tool for rounding values, and works with all types of Formats.
<a href="#top">Back to top</a>
<a name="Width"></a>
Width
The width of the table columns can be manually adjusted by entering in integer pixel values. The default is set to "Auto", which determines the width based on the longest value in the first twenty-five results.
<a href="#top">Back to top</a>
<a name="Alignment"></a>
Alignment
Alignment controls where the text falls in the cell. There are three options available: Left, Center, and Right.
<a href="#top">Back to top</a>
<a name="TotalColumn"></a>
Column Total
The "Show Total Columns" option will only be available to numeric columns, and adds a row to the bottom of the table. This row will show the sum of all cell values for the columns that have this option enabled.
<a href="#top">Back to top</a>
<a name="ColorSettingsConditional"></a>
Color Settings & Conditional Formatting
<a href="#top">Back to top</a>
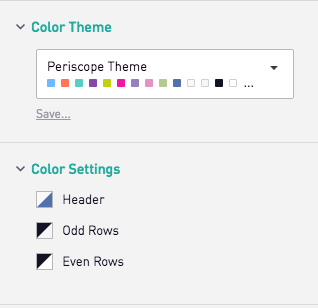
<a name="ColorSettings"></a>
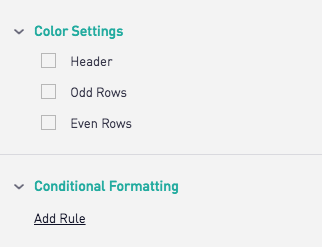
Color Settings
Sisense for Cloud Data Teams supports coloring both the text and background of the following:
- Header
- Odd Rows
- Even Rows
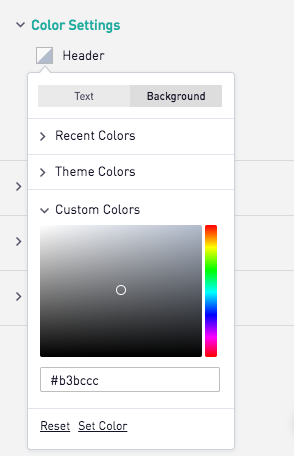
A default set of colors are applied to the different segments in a chart. Users with the color theme add-on will have the ability to create and save separate themes that can be set as the default or quickly applied to the chart.
<a href="#top">Back to top</a>
<a name="ConditionalFormatting"></a>
Conditional Formatting
Conditional Formatting can be used to highlight a particular cell or cells within one column that matches the specifications. To use conditional formatting, first select a column, then choose one of the conditions, and finally pick an appropriate threshold value. Only static threshold values are supported.
<a href="#top">Back to top</a>
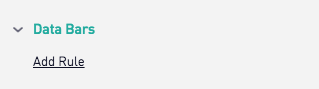
<a name="DataBars"></a>
Data Bars
Data bars visually represent the value of a cell relative to a column's minimum and maximum value. To configure a column to use data bars, select "Add Rule" under the data bars section in the chart format tab.
Select a column from the dropdown and the format to be applied to a positive and negative value. Note: Only numeric values will be represented by a databar.

Data bars are drawn within a cell with the position of the zero being based on whether the column consists values that are positive, negative, or a mixture of both. Columns with a positive value will have a left aligned zero while columns with negative values will have a right aligned zero. If the column contains a mixture of positive and negative numbers, the data bar's scale will be the range of minimum to maximum values. The data bar will expand to the left of zero's position on the scale if negative or right of zero's position on the scale if positive.
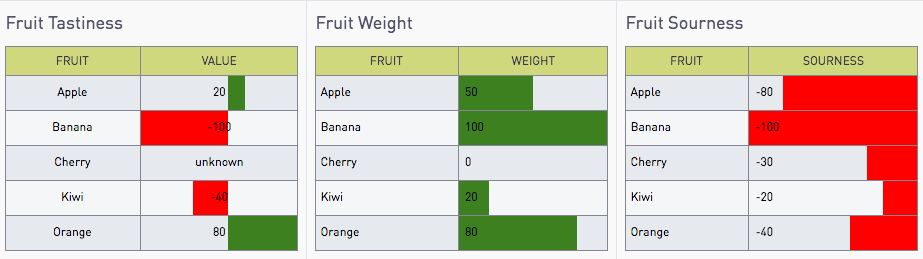
Any conditional formats configured in Conditional Formatting will take precedence over the formatting created by databars.
<a href="#top">Back to top</a>
<a name="Hyperlinks"></a>
Hyperlinks
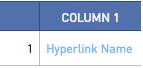
Tables will automatically convert a valid URL string starting with https:// or https:// into a clickable link. A URL can also be labeled to display a clickable name by utilizing the following syntax:
select '[Hyperlink Name](https://www.google.com)'
This query will result in the table shown below:
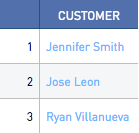
This syntax can also utilize data from individual columns to make the hyperlinked name dynamic. The following query uses "First_Name", "Last_Name", and "Twitter_Account_URL" columns to build out the link:
Redshift/Postgres:
select '[' || First_Name || ' ' || Last_Name || '](' || Twitter_Account_URL || ')' as Customer
MySQL/SQLServer/BigQuery/Oracle:
select CONCAT('[', First_Name, ' ', Last_Name , '](', Twitter_Account_URL, ')') as Customer
The result is shown below, and clicking each link will open up that user's twitter page:
<a href="#top">Back to top</a>
<a name="TableImage"></a>
Images in Tables
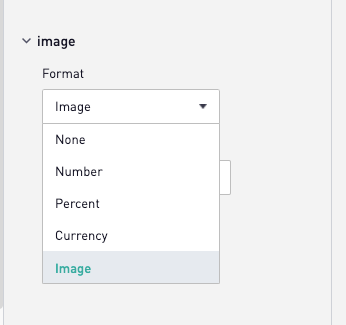
To display an Images in a table first select an image in the query. Then, in the series settings section select image as the format.
This will display a table with images.
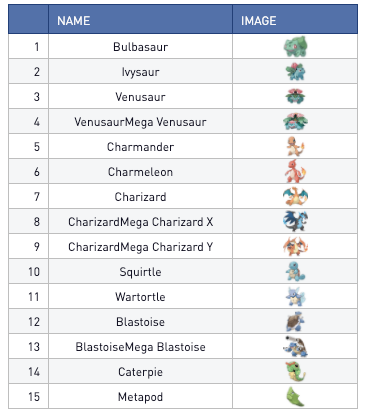
By default the image is 25 pixels the same as the default size of a row of the table. To change the size of an image, input the desired height and width of the image.

<a href="#top">Back to top</a>
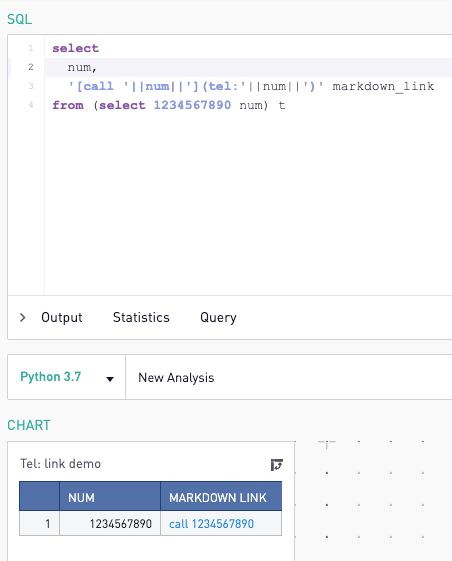
<a name="TelephoneNumbers"></a>
Telephone Numbers
Tables will automatically convert a valid telephone number starting with 'tel:' into a clickable link.
select 'tel: '|| number as Call_Number

A telephone number can also be labeled to display a clickable link by utilizing the following syntax:
select '[call '|| number ||'](tel:'|| num ||')' as Call_Number
<a href="#top">Back to top</a>