
SCIM Integration | Sisense for Cloud Data Teams
👤 This documentation is intended for Site Administrators.
The SCIM (System for Cross-Identity Management) integration allows for the synchronization of roles and permissions between Sisense for Cloud Data Teams (CDT) and Okta. The SCIM specification is an open standard designed to manage user identity information. SCIM provides a defined schema for representing users and groups, and a RESTful API to run CRUD operations on those user and group resources.
NOTE: Given that SSO/SCIM requires heavy configuration, we recommend contacting Support before you begin testing, and turning on Support Access ahead of time. With this, Support will be available to log into your system and revert SSO/SCIM changes in a more timely manner.
NOTE: SCIM is only available for Cloud Data Teams customers who have Okta SSO as their Identity Provider (IdP) and have RBAC enabled.
<LI><a href="#Before Starting Setup">Before Starting Setup</a></LI>
<LI><a href="#Assign a User to Sisense for Cloud Data Teams in Okta">Assign a User to Sisense for Cloud Data Teams in Okta</a></LI>
<LI><a href="#Add Custom Attributes to the Okta User Profile">Add Custom Attributes to the Okta User Profile</a></LI>
<LI><a href="#Enable & Configure SCIM Integration">Enable & Configure SCIM Integration</a></LI>
<LI><a href="#Configure Sign-on Method">Configure Sign-on Method/a></LI>
<LI><a href="#Provisioning Users in Okta">Provisioning Users in Okta</a></LI>
<LI><a href="#Logging In via SSO using SCIM">Logging In via SSO using SCIM</a></LI>
<LI><a href="#Deprovisioning Users">Deprovisioning Users</a></LI>
<LI><a href="#Troubleshooting">Troubleshooting</a></LI>
<LI><a href="#Example Python Script">Example Python Script</a></LI>
Before Starting Setup
- Complete the Okta SSO Integration before attempting to enable SCIM. SCIM requires that this integration is already in place and functional.
- Compile a list of existing user roles and role assignments using the User and Role Management API or the <LI><a href="#Example Python Script">Example Python Script</a></LI> to write users’ names, emails and roles to a .csv file. This information is necessary to ensure that users are set up correctly with their current role assignments.
- We do not recommend testing SCIM setup on a production environment that is business-critical. If you require a test space, please contact [email protected]
- Setting up SCIM will require you to jump back and forth between CDT and Okta. It is suggested that you have both browser windows open throughout the process.
- The order in which you perform these actions can impact the success of your SCIM setup, so read the documentation carefully.
<a href="#top">Back to top</a>
<a name="Assign a User to Sisense for Cloud Data Teams in Okta"></a>
Assign a User to Sisense for Cloud Data Teams in Okta
In this step, you will assign the Admin user to the application, and configure the user profile in Okta, so that the user will be able to enable and configure the SCIM integration.
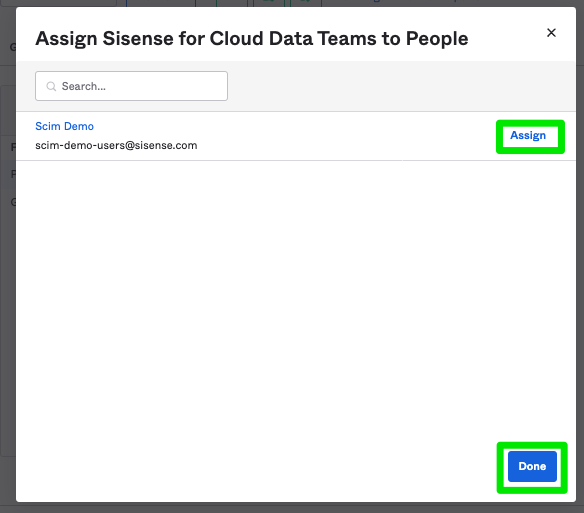
In the Sisense for Cloud Data Teams application, click Assignments > Assign to People.

Search for the user, and assign to the app by clicking Assign > Done.
<a href="#top">Back to top</a>
<a name="Add Custom Attributes to the Okta User Profile"></a>
Add Custom Attributes to the Okta User Profile
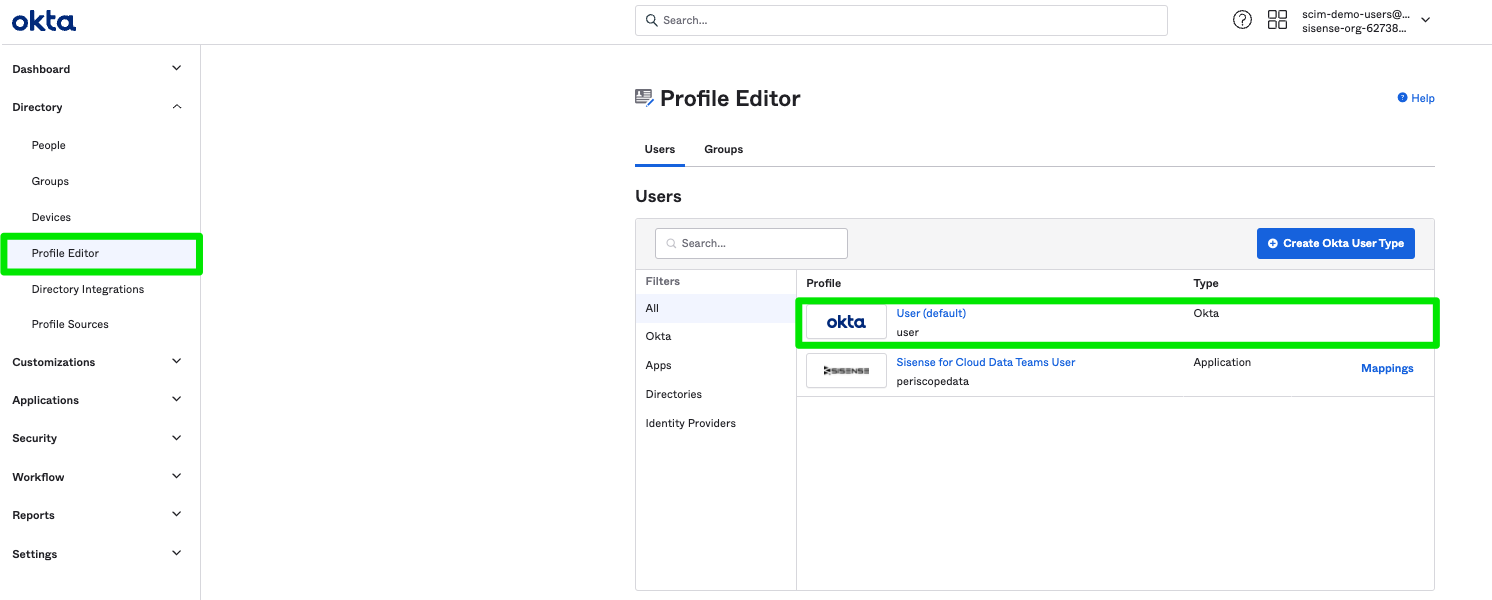
In Okta, go to Directory > Profile Editor in the left navigation, and select User Profile. This is the profile that will be configured for all your users.
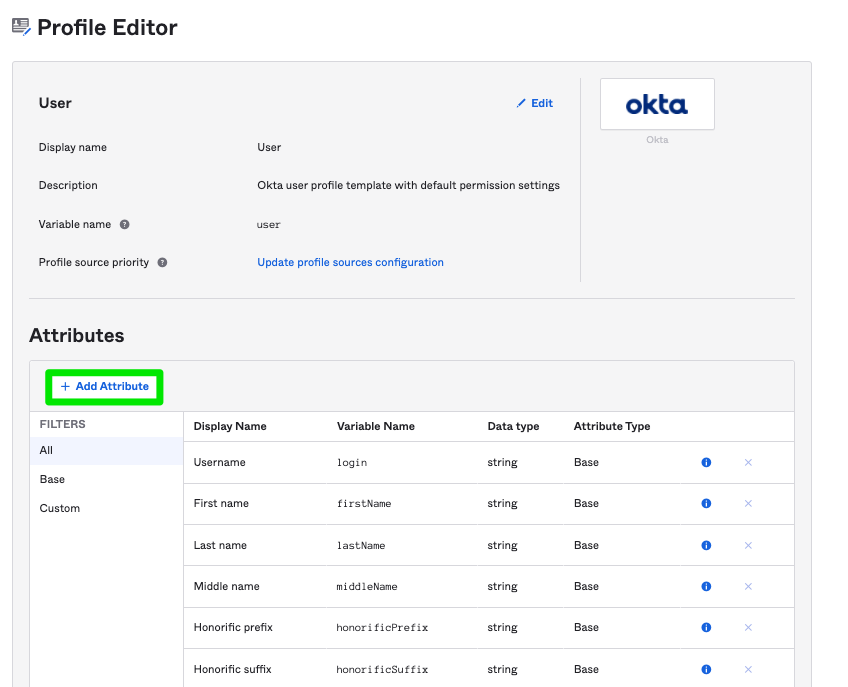
Click Add Attribute in the Profile Editor.
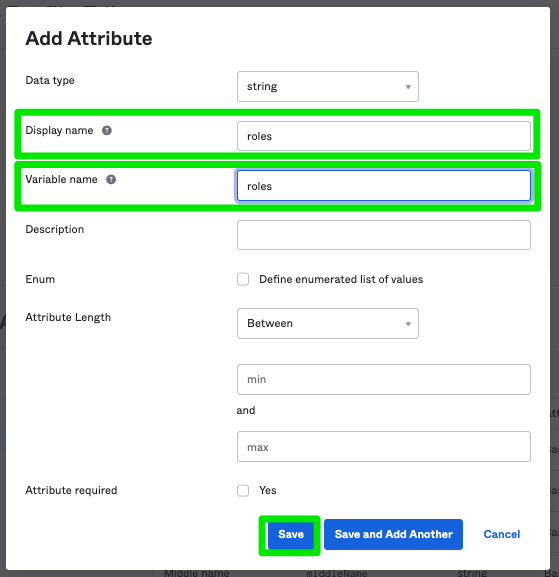
In the Display name and Variable name fields, type roles, and click Save. After doing this, every user who uses this profile will have the attribute of ```roles``` available.
<a href="#top">Back to top</a>
<a name="Enable & Configure SCIM Integration"></a>
Enable & Configure SCIM Integration
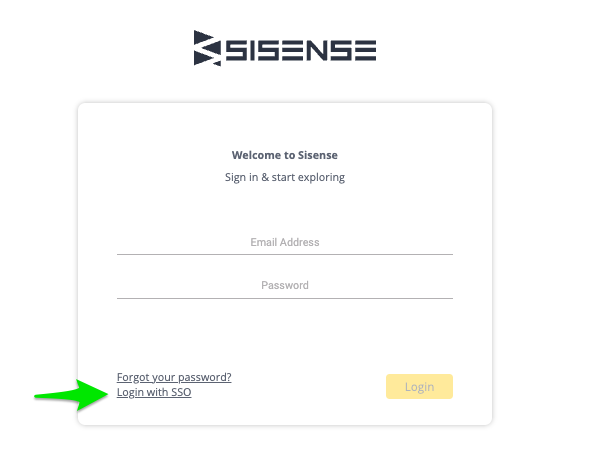
Log in to CDT using the Login with SSO link.
Go to the Billing & Authentication page from the gear icon in the left navigation.
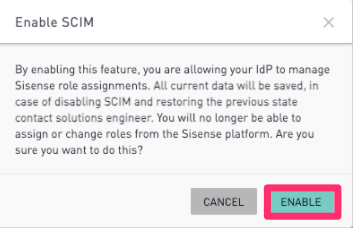
Choose your Default Space from the drop-down list of spaces and check the Enable SCIM Provisioning checkbox, and click Save.

On the Enable SCIM confirmation modal, click Enable.
A Site Host and API key string will be displayed. The API key format is “site_host:SECRET”. This API key will be used in Okta to configure the SCIM integration. Copy and store this key, as it is generated only once. If lost, a new API key will need to be generated and updated in Okta.
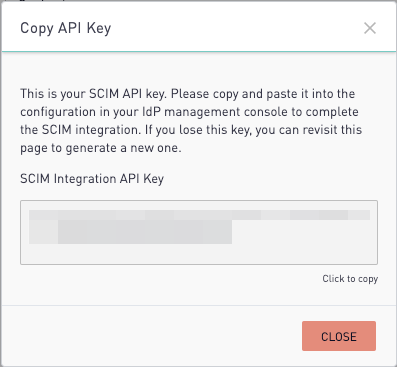
NOTE: Due to syncing issues, close the Copy API Key modal before testing close this modal BEFORE testing the API credentials in Okta.
Return to Okta. Click Applications > Sisense for Cloud Data Teams > To App > Provisioning. Click Edit to populate the API key, and test the integration.
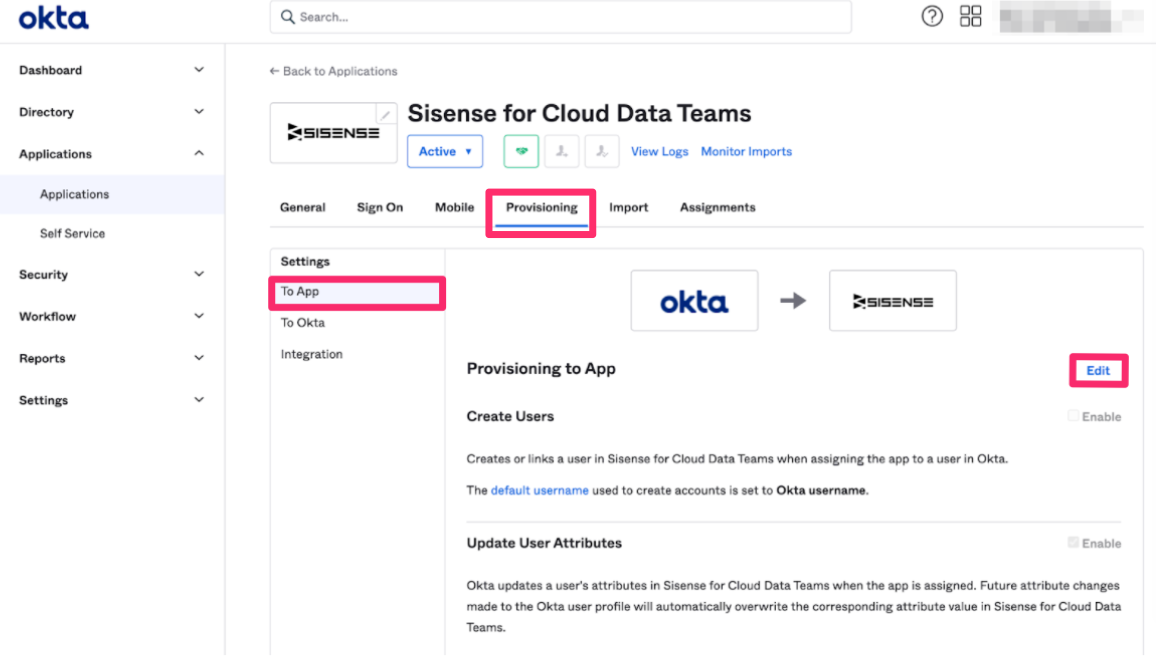
Click Configure API Integration.
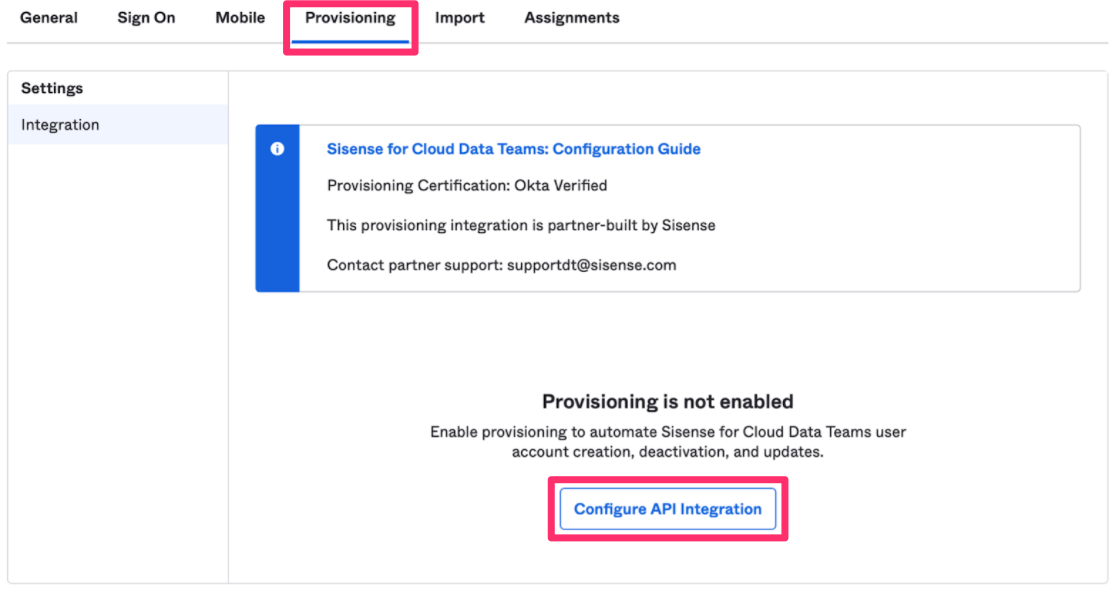
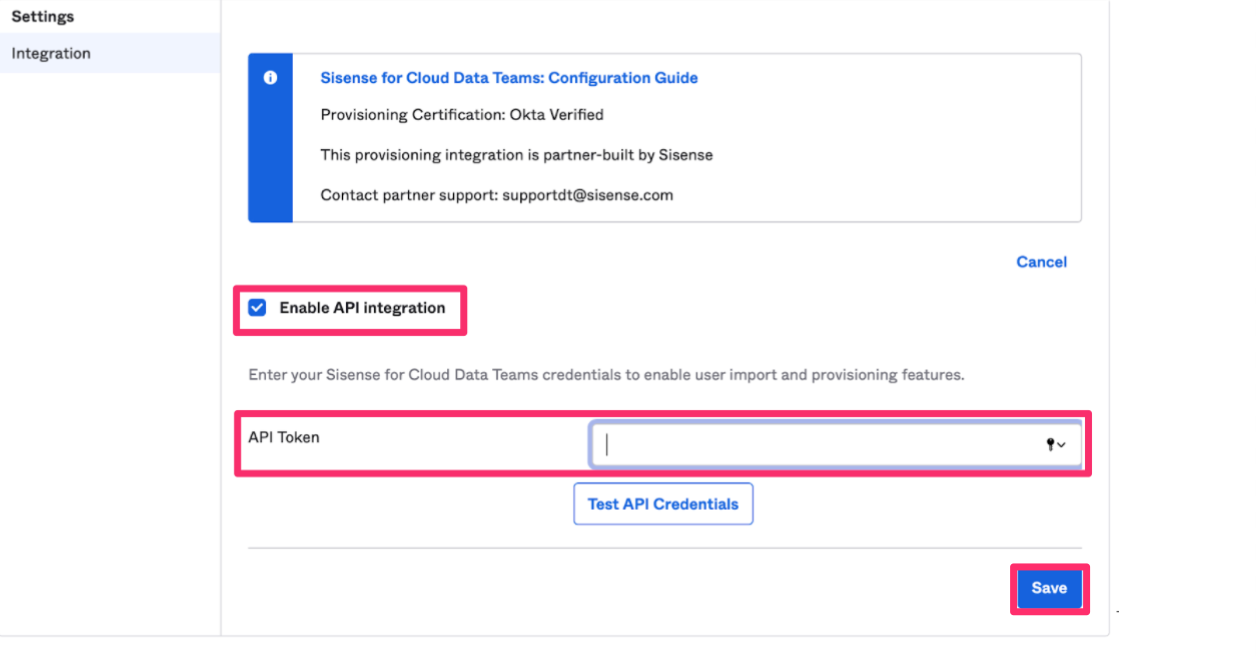
Click the Enable API Integration check box, which will display a field to populate the API key. Use the API key provided in the previous section, and click Test API Credentials. When you receive the success message, click Save.
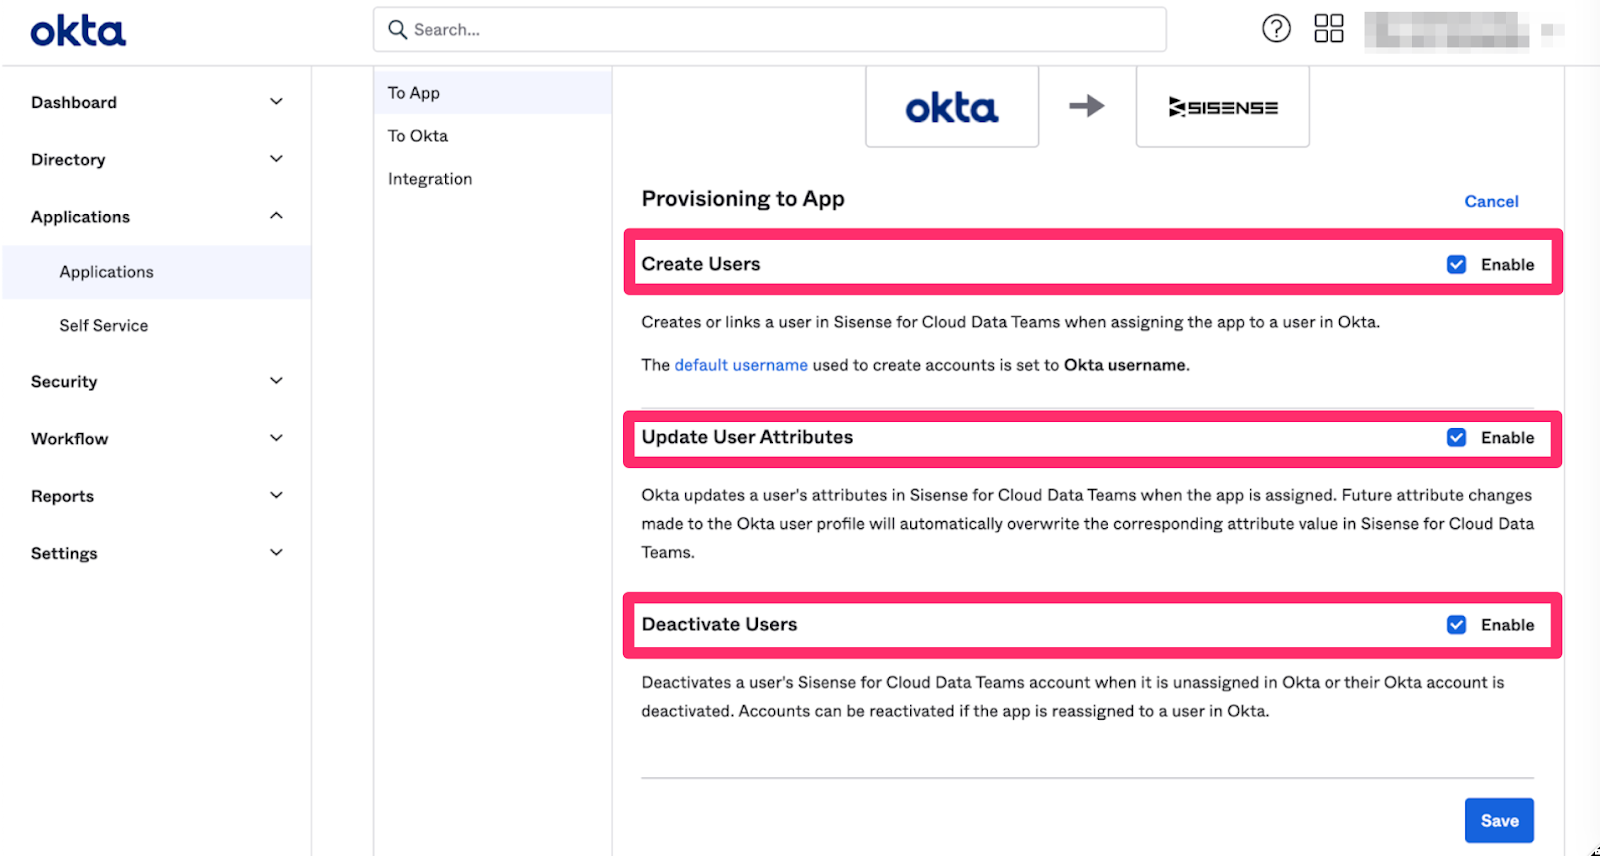
Click Edit again to allow Okta to provision users to CDT.
Select the workflows you want the integration to control by checking or unchecking the boxes next to the workflows. Then click Save. You can allow Okta to:
- Create Users
- Update User Attributes
- Deactivate Users
<a href="#top">Back to top</a>
<a name="Configure Sign-on Method"></a>
Configure Sign-on Method
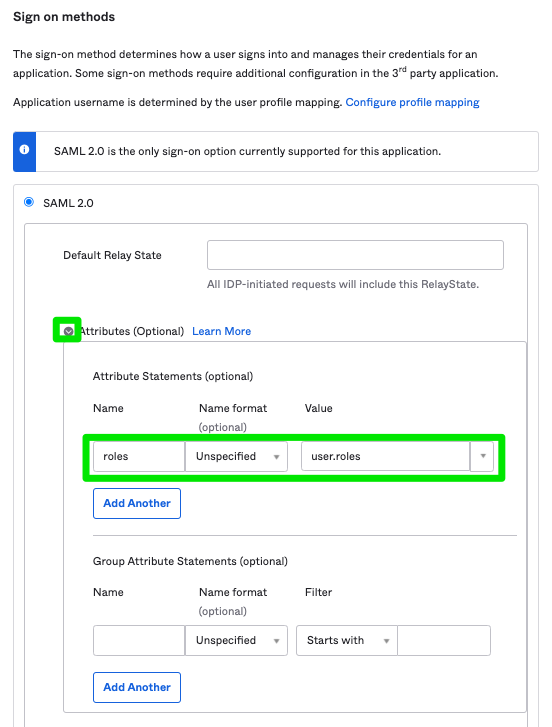
Within the Sisense for Cloud Data Teams app, click Sign On > Edit > Attributes.
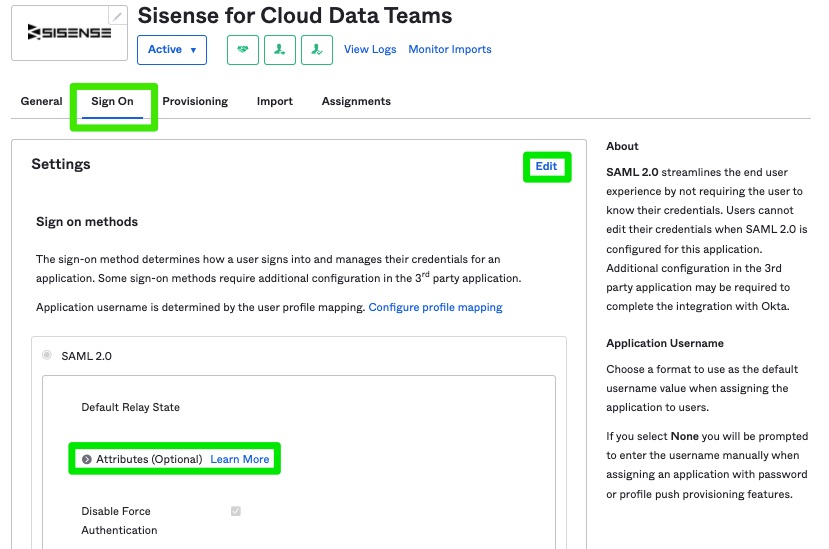
Within the Attribute Statements, enter roles in the Name field and user.roles in the Value field . Then click Save.
<a href="#top">Back to top</a>
<a name="Provisioning Users in Okta"></a>
Provisioning Users in Okta
There are two ways users can be provisioned (synced):
- Via a user’s profile
- JIT (Just In Time)
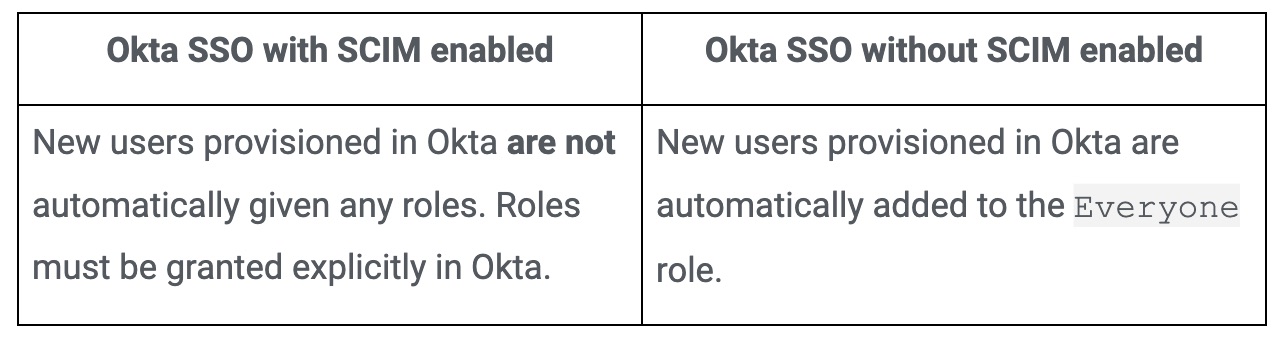
Be aware that provisioning behavior differs from sites that use Okta SSO with SCIM enabled, and without SCIM enabled:
In Okta, go to Applications > Assignments. If the user is displayed in the list, you can click Assign. If the user is not displayed, click Assign to People and search for the user.
Identify the user you want to provision, and click Assign next to the user.
Open the user’s profile by clicking on the blue user name link under Assignments. Click Profile > Edit to display the attributes associated with that user.
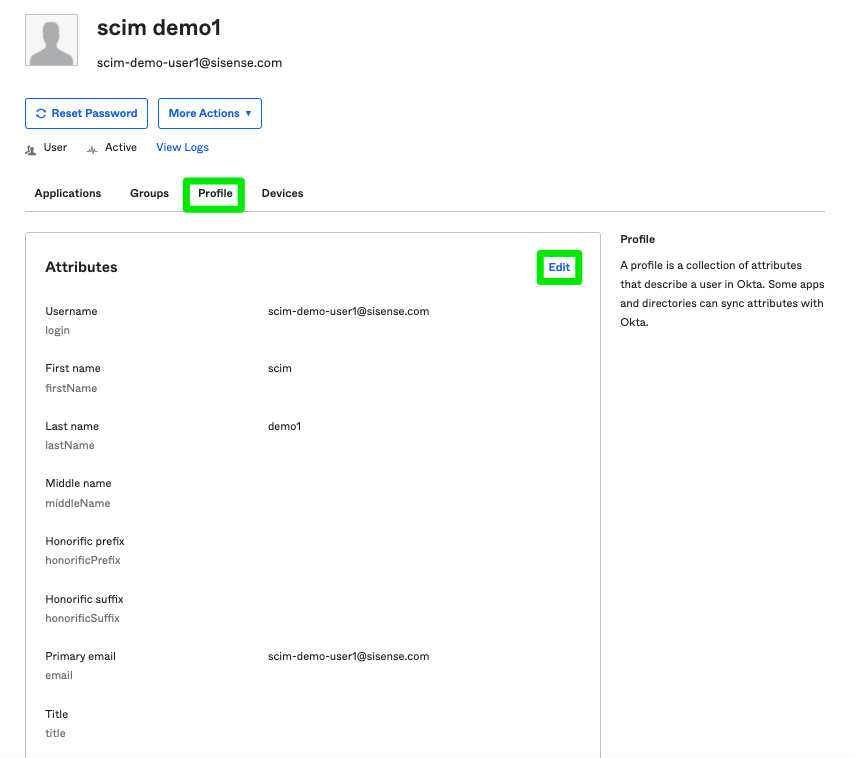
The custom attribute role should be displayed at the bottom of the attribute list. Use this field to add the appropriate roles, and click Save.
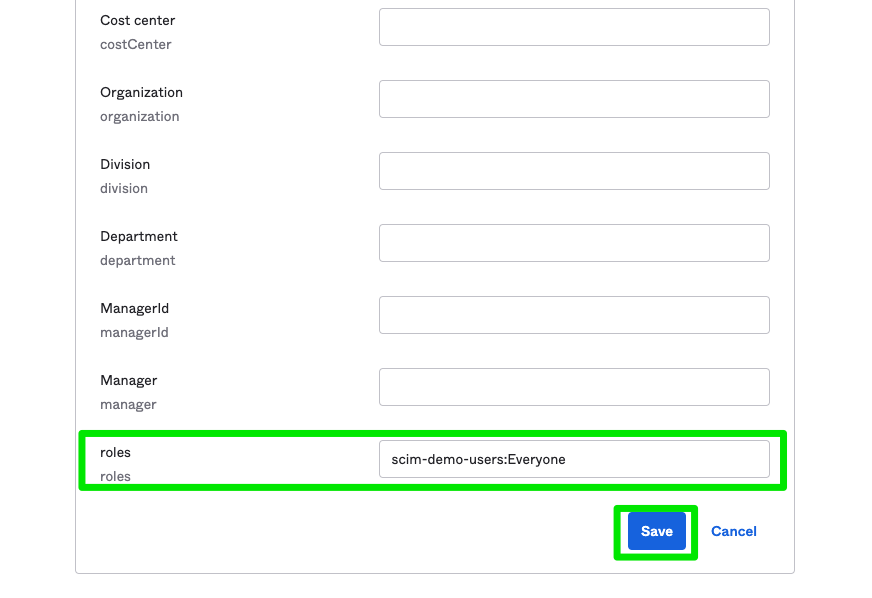
Roles exist in a site's Roles and Policies page including both the Cloud Data Teams default user roles (Everyone, Admin, Analyst, and Business User) as well as custom roles. Multiple roles should be comma separated and are case sensitive. Characters entered in these fields should match the characters in application. In this way, different `roles` and `platform` can be added for different Spaces if a site has more than one Space available and can be added following the format below:
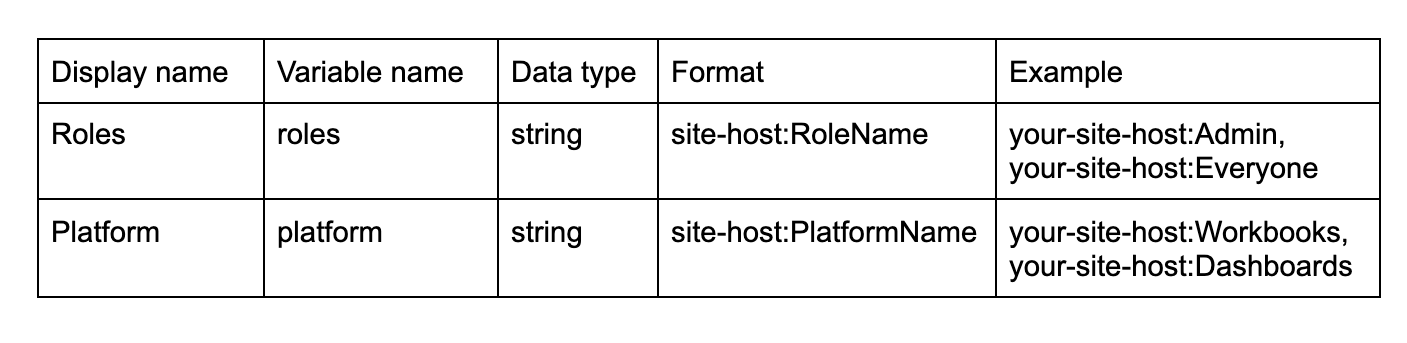
The `site-host` can be found by referencing a dashboard URL:
https://app.periscopedata.com/app/example-site/10/example-dashboard-name
After saving, assigned `roles` and `platform` will be visible in the user’s profile in Okta. The user will then have access according to the `roles` and `platform` to which they have been assigned.

<a href="#top">Back to top</a>
<a name="Logging In via SSO using SCIM"></a>
Logging In via SSO using SCIM
As soon as users are provisioned in Okta, they can log in to Cloud Data Teams using the Login with SSO link.
If the user has already logged in, they may need to refresh their browser to see this change in their permissions. Provisioning through the user’s profile should allow existing Cloud Data Teams users to log in without any issue.
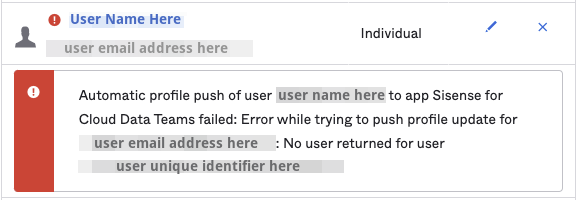
When a user logs in for the first time, by default, Okta will only provide the users ‘first name’, ‘last name’ and ‘email’. It will not include any roles. In this case, a user may receive a message stating that they have “No Privileges”.

The message indicates that the user is successfully able to access Cloud Data Teams via Okta with SCIM. However they have not been provisioned to any roles and therefore have no privileges. The Okta Admin will need to assign roles in Okta before the user will be able to access Cloud Data Teams successfully.
Admins may see an error associated with a user in Okta until the user logs into Cloud Data Teams. A user does not exist in Cloud Data Teams until the first the user logs into the application using SSO. This error will most likely occur after making changes to a user via their profile in Okta.
<a href="#top">Back to top</a>
<a name="Deprovisioning Users"></a>
Deprovisioning Users
If a user is removed from the Okta app or deleted in Okta, the user will also be deleted in Cloud Data Teams. Users that are deactivated in Okta won't be automatically logged out of Cloud Data Teams if they have no permissions.
However, those users will not be able to perform any actions once they are deprovisioned and will be logged out after they refresh the page or their current session is otherwise ended. Users with permissions that are deactivated in Okta will be automatically logged out.
<a href="#top">Back to top</a>
<a name="Troubleshooting"></a>
Troubleshooting
Provisioning Alerts
Admins must provide a minimum of one email address for provisioning alerts. Any errors generated during provisioning will send an email to the address(es) provided.

Error messages associated with SCIM will display a list of errors associated with the user.

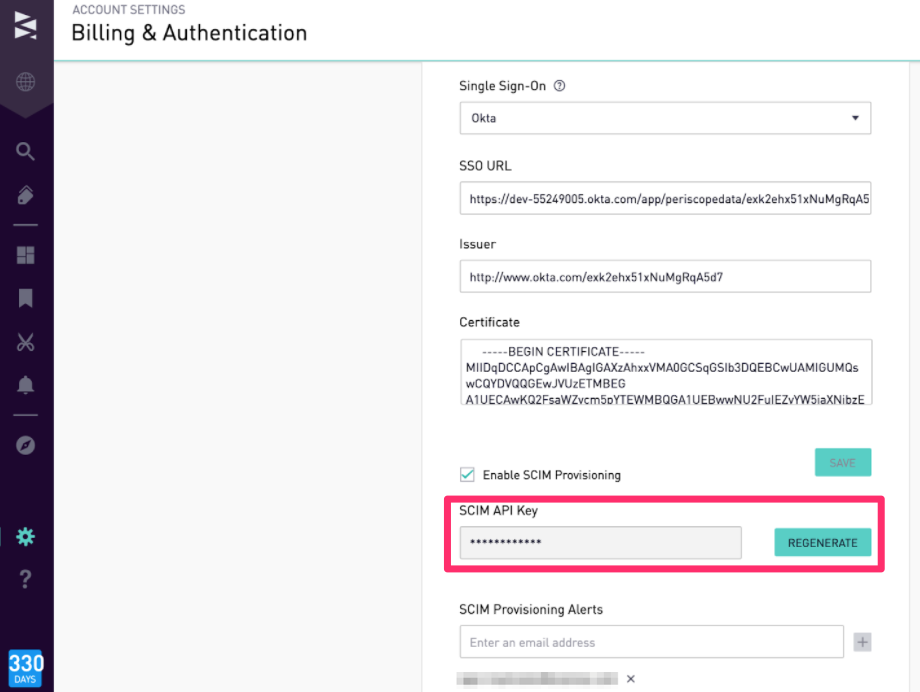
Generate a New API Key
If you need to generate a new API key, open the Billing & Authentication page. Next to the SCIM API Key field, click Regenerate.
<a href="#top">Back to top</a>
<a name="Example Python Script"></a>
Example Python Script
import requests
import json
import csv
#insert site host and api_key
finished = False
next_page_start = ''
header = ['login', 'firstName', 'lastName', 'email', 'roles']
site_host = 'site host here'
#open a csv file with write access
with open('userlist25.csv', 'w') as outfile:
writer = csv.writer(outfile, delimiter=',')
writer.writerow(header)
while finished is False:
headers = {
'HTTP-X-PARTNER-AUTH':'site host here:api key here',
'Content-Type' : 'application/json'
}
url = 'https://api.periscopedata.com/api/v2/users/?next_page_start='+next_page_start
response = requests.get(url, headers=headers)
response = response.json()
#loop through each user in json response and grab first name, last name, and email
for line in response['users']:
user =(line['email']+','+line['first_name']+','+line['last_name']+ ','+ line['email'])
#loop through roles for each user and join roles with semi colon for easy csv output
roles = ';'.join(site_host+':'+role['name'] for role in line['roles'])
#write the user and role data together to a CSV
outfile.write('{}, {}\n'.format(user, roles))
if response['next_page_start']==None:
finished = True
else:
next_page_start = response['next_page_start']